Some progress

In the meantime I finished the driver’s figure:

The boots and the trousers will be weathered with some mud, and the head (as well as the hands) only received the first layer of skin color. The head is from Hornet, and really very finely detailed.

The already built part of the Opel’s driver cab has been painted and the first weathering steps are also visible: some fading with oils, sponge chipping and added dirt on the floor. The dashboard is almost finished, the only things missing are the glass covers of the different displays and perhaps a piece of cloth in the tray.

The color is Tamiya German grey, on top of it I sprayed some acrylic varnish. The varnish is supposed to be matte, but to me it adds a very nice satin finish.

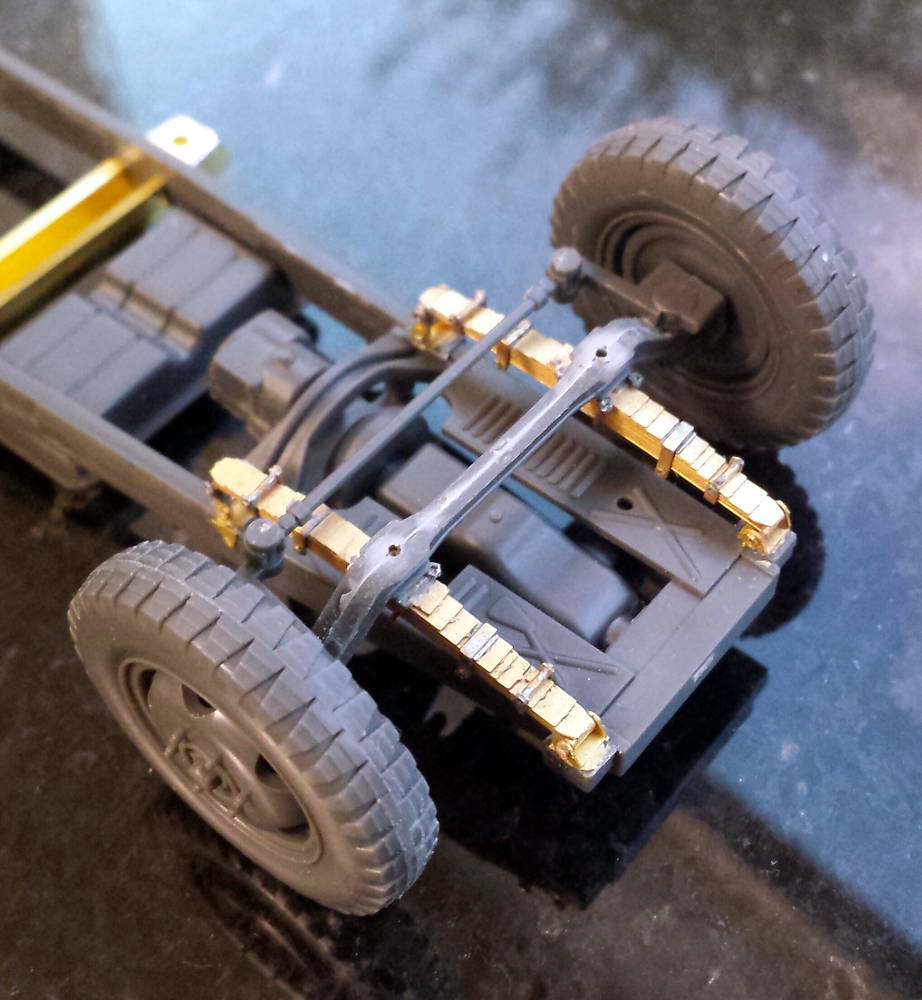
The leaf springs are also almost finished. They are quite good to build, and soldering most of the parts really helps. I already mounted the front axle to the frame:

Federn 01


The driver’s cab

I continued to rework the driver figure. Now I also used Magic Sculpt. This putty is much softer than Milliput, and is therefore much easier to feather into existing details. For details that are better made from some harder material, it is advisable to let it cure for a while or to switch to Milliput instead.


And that is how the figure looks like now:

The right arm and the touch ups on the collar are made from Magic Sculpt.

I also continued building the driver’s cab:

The dashboard is now finished. Building the hood from the PE parts in the set is a delicate task, but the louvers on both sides are nicely detailed and definitely worth the effort. Now some parts are still to be added, and then this group will be painted (without roof, doors and back wall for the time being). Until then the driver figure will also be finished.

Working with epoxy putty

For all changes to my figures I made until now I used the standard Milliput putty. I also have some Magic Sculpt on the shelf, that I will try later.

It is very important to work with very thinly rolled sheets of putty. To roll out putty, I use baby powder. Pour some powder on a smooth even surface, and you can start, using some round piece of metal.

To apply and smooth the parts made from putty I use rubbing alcohol. If you want to touch up some areas on already painted figures, you can also use tap water thus avoiding to remove the paint again by accident. If some putty is left, you can keep it in the freezer, where it should stay workable for at least 24 hours.

I have just started to use putty for remodelling figures, but I think the key is to work in single layers, and to always wait for the putty to cure in between. So you have a lot of control over the process and are safe from accidentaly damaging already sculpted areas again.

New project – Opel Blitz 3t cargo truck stuck in Russian mud

After finishing the BMW R75, I started a new project: One of the famous Opel Blitz 3 ton cargo trucks stuck in mud and being pulled out. For some inspiration, have a look at https://en.wikipedia.org/wiki/Rasputitsa

I use the kit from Tamiya, together with a PE upgrade set from Voyager. I also found some real leaf springs on the web from Minor.

I will add some figures as well, but I will now start with building the Opel. The first part will be the drivers cab, followed by the frame and the cargo bay. It looks like it is possible to build everything separately and join the three construction groups at the very end of the construction. The PE set comprises some additions to the cab and a complete rebuild of the cargo bay. Looks challenging…

Some first pics of the cab:

The clutch is pressed, the other parts are all from the PE set. The dashboard lacks some switches and buttons to be scratchbuilt.

I want to use one of the two figures included in the Tamiya kit as driver. They are very poorly moulded, so I started to rework one figure. I changed the boots to fit them to the clutch pedal and the throttle, and added a Hornet head. I just started to sculpt the uniform jacket again:


Some more progress

I fixed the side car to the bike and started to add dirt. The dirt is made from pigments and some enamel colors:

The brass pins in the tires will be used to fix the bike to the base.

And that is how the whole thing looks from below:

The dirt still needs some more refinement, with some splashes added. And of course the MG on the side car ist still missing.

Proceeding with the BMW bike

After the side car was built, I started to paint the bike. An initial primer layer of Mr Resin Primer was followed by Tamiya German grey, which was in turn oversprayed with a slightly brighter color mixed from German grey and light grey. I then tried to chip the upper color layer very cautiously using thinner and a brush, but this went not as intended. At least the color looked a bit faded, but I still have to add some chipping later with a brush.

Then I started to paint the details (engine etc.) with acrylics:

The sidecar decals are from the Masterbox kit, the registration plates are self made decals, as the kit decals do not fit onto the PE parts… The jerry can and its mount can be seen on a lot of war time photographs, and I really liked to also add this detail.

Then I continued painting the details, and also applied a pin wash made from dark oils. I also used my oil colors for a lot of little fadings and stains:

I will now continue with applying some highlights on the grey color, which will be followed by a filter to add some warmth to the grey. And then… the dirt…


The brass party

Since the last post I finished the figures and continued to build the bike. Below are some pictures of the two soldiers:

And now the news from the BMW bike:

After the failed builds of the Masterbox kits, I decided to build the frame of the bike from brass tubes and rods. This turned out to be a nice idea, as metal is much more stable than plastic (and also looks much better). I then also built the fork for the front wheel from brass parts.

I also bought the BMW R75 kit from Italeri. All in all this kit is not very good, but the engine is very nicely detailed, especially the cooling fins on the cylinders are much better detailed than the ones from the Masterbox kit.

The bike itself is now almost finished, apart from some details. The side car is still waiting to be build…

And this is how the bike looks now:

The bike is a mixed build from two different Masterbox kits, some Italeri parts, the PE parts from Masterbox and a lot of scratch built parts made from brass and copper.

One comment on the PE parts from the Masterbox kit. They are made from brass, but covered with a thin coating. So it is almost impossible to glue or solder them. The solution to this problem is visible on the pictures: simply sand the PE parts cautiously, until the coating is removed (at least partly), and now both the  superglue and the solder work as expected.

So after some frustrations at the beginning, the build was fun until now, and I am looking forward to continue with the side car and of course to paint the model. And one more comment: the reference material available on the web from BMW proved to be really, really helpful.

Continued to work on the soldiers

In the meantime I continued to paint the two soldiers. The first figure is finished (apart from the head) and already fixed to the base:

I used predominantly acrylics, with some oil washes added to a few spots (e.g. on the MP 40 sub machinegun). The dirt speckles on the coat are enamels, applied with a brush that was flickered against some solid stick, like another brush or tweezers. I find this method of application much more controllable than blowing air from the airbrush against the brush filled with color.

The second figure is also in the course of being painted, I am busy with the gloves right now:

The first pictures show the highlighted and shaded coat, the last pictures the current state with further details added.