Finished

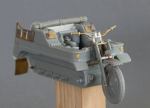
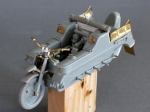
In the meantime I had the chance to finish the Kettenkrad and the figures in almost one go, with some relaxing weeks of holidays in between. So this is now the result:

The figures where finished and painted using Vallejo acrylics and some oil washes. The Krad was heavily weathered, starting with sponge chipping and some hand painted chips, using oil washes and a lot of dirt, consisting of oils, plaster and white spirit.

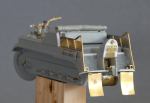
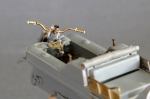
For the base, I discovered that artists’ acrylic paste mixed with plaster and acryilc color makes some very good mud, and I also applied this mixture to the Krad and the trailer. The puddles of still water were added using Vallejo Still Water.

The load of the trailer is from the spare box, and consists of jerry cans, blanket, and bags.

Now this project is finished, it was very demanding due to the sculpture of four figures and the amount of changes required for the Kettenkrad, but I also had a lot of fun and I am quite happy with the result (and my somewhat improving sculpting skills)…

The interior is ready to be painted

Now I finished the interior to the point that it can be painted, before the two halves of the frame will be glued together. I used an Aber PE upper hull set, and also replaced the engine cover with brass parts. All other parts are from Aber PE sets, and some like the seats or the gearing are completely scratch built:

The stains on the brass parts are from the flux I use for soldering. Looks not very nice, but the surface will be totally even and clean when finally painted.

Building the interior

The armoured personnel carrier will be built from inside out. I will start with the interior, with the lower and upper part of the hull still being separated. After painting and weathering, the two halves will be glued together, and the construction of the vehicle will be continued.

I started already to work on the interior. The floor plates are from Aber, as well as most of the other brass parts visible. As on the lower inner parts on both sides of the hull imprints of the mould releases are quite visible, I added a thin sheet of brass on each side. The seats are scratchbuilt from brass, and the seat cushions are made from Magic Sculp.

New project – SdKfz 250 armoured personnel carrier with mud camouflage

The following picture provided the inspiration for this project:

It shows a SdKfz 250 armoured personnel carrier, with a camouflage pattern made from mud being applied. The vehicle that I will use is from Dragon, and has already been on my shelf for quite some time. Additionally, I will use some Aber PE sets.

The Krad is ready to be painted

I have now finished the construction of the Krad, and now it can be painted:

The first two figures are finished

In the meantime I finished the first two figures that will be sitting on the bench in the back of the Kettenkrad:

With the third figure, that will sit on top of the other two, I am currently working on the coat. I just realized that the belt is sitting way to high up, so there will be some corrections to be made. Work on the fourth figure (sitting in the trailer) has just started:

Further work on the Kettenkrad riders

Based on my experience from scultping the PaK crew, I think that is really important to shape the body proportions accurately. Doing so, sculpting the clothing is much easier, as there is no need to correct the shape of the body, and full attention can be paid to get the clothing right.

I also noticed that it is so much easier to sculpt clothing from putty that has already started to cure. It is less sticky, holds the shapes much better and there is almost no danger of leaving fingerprints on items made from rolled out putty when applying them to the figure.

Bearing these findings in mind, I continued to work on the two soldiers that will sit on the back seat of the Kettenkrad. The pictures show them at a stage where the trousers are shaped, and the lower parts of the coats are also put into place. You can also see the much more defined upper parts of the body.

Continuing with the Krad

I continued to build the rear of the Kettenkrad, adding the rails on both sides and the exhaust (which was completely missing in the kit). I also started to glue the overlapping road wheels of the running gear together, to avoid later problems with adjusting the wheels precisely. The whole array of wheels can still be removed from the axles to faciliate painting: